


2 Minutes Summary
India’s E-commerce Sales are growing at an annual rate of 51% making it the biggest opportunity for online retailers. Dropshipping is a method of supply chain management in which the retailer accepts the order from the customer and then transfers the details to either the manufacturer or a wholesaler or any other retailer who then ships the goods directly to the customer. What you do not need to do in Dropshipping is Inventory Management, Warehousing, Packaging, Shipping. Payment Providers may differ according to the area where you live. The three main payment providers are Shopify Payments, Paypal and Stripe. Also, it includes Hot to get sales from FB Ads and add FB pixel to your Shopify and many more. Full Detail in Blog.
Do you know what dropshipping business is?
Have you ever wondered about running a successful business with no investment! It is possible because of Dropshipping.
Dropshipping is a method of supply chain management in which the retailer accepts the order from the customer and then transfers the details to either the manufacturer or a wholesaler or any other retailer who then ships the goods directly to the customer.
The retailer does not possess any goods in stock with himself.
Here is the detailed guide to be followed to create a profitable Dropshipping Business:
Dropshipping Business Overview
India’s E-commerce Sales are growing at an annual rate of 51% making it the biggest opportunity for online retailers. And by 2020, it is expected that e-commerce sales will account for $120 billion in revenue.
Have you ever wondered about running a successful business with no investment! It is possible because of E-commerce Business.
In earlier times, the businesses run on an offline mode but now it has shifted towards the online mode. The model remains the same, only the platform has been changed.
There is a huge difference in maintaining an e-commerce store vs a dropshipping store. Dropshipping is an extension of E-commerce Business.
In E-commerce business there are many aspects such as creating a store, Managing Inventory, Hiring Employees because of Shipment of Goods, Contacting the Courier Companies. The Operational Costs are very high in maintaining an e-commerce store. Also, the shipping time is high.
But in Dropshipping, you eliminate all the complex activities that a normal e-commerce business have by just following some simple steps:
You will first create an online store. Now you will select the products from suppliers that are present on Aliexpress.com, DHgate.com, etc., and then import the selected products on your online store.
Once you have imported the products on your website, you will start promoting your store through Facebook Ads and Google Ads.
After seeing the Ads, the potential customer clicks on that particular ad and if they purchase the product through that ad, then you place the same order to your supplier and he then ships the product directly to the customer.
It is that simple but challenging. Yes, it is challenging as you have to choose those products which are profitable and have a huge demand in the market. The competition in this niche is growing as Businesses are getting aware of this concept and are entering this niche to dominate it.
But think the other way round. If there is competition in a particular niche that means that it has a huge scope to capture around. The Market which has high competition means it is booming.
Talking about the Business Model, The drop shipper earns huge profits and with minimum costs involved. Then they have Customer Care Support as well which helps you solving all your concerns.
What you do not need to do in Dropshipping:
- Inventory Management
- Warehousing
- Packaging
- Shipping
What is Dropshipping Business?
It is a Virtual Business Model. The First thing we will do is to build an eCommerce Store. After Building the Ecommerce Store, we will stock the physical products in it with the Images and description of Products. But we need to stock it from somewhere.
Therefore, we go to Aliexpress.com which is a China Based Website having Millions of products with suppliers having a USP of very reasonable prices as compared with amazon.com.
For Instance, We find a T-shirt of $3 on Aliexpress.com, then we will take the image and description of that T-Shirt and put it on our E-commerce Store for $20.
The Next Step we are going to do is to find a customer who will buy the T-shirt. We can do it through Facebook Ads and Instagram Ads and drive traffic to our website.
Once the customer clicks on the ads and visits our website and purchase through our website, then we will give the customer details to our supplier and tell them to ship that particular product on the provided address.
In the whole process, the drop shipper just acted as a middleman between the supplier and the customer and helped both the supplier and the customer in satisfying their needs and wants.
After the product is shipped, the payment is received by the dropshipper and then he pays the amount of the product that he has purchased from aliexpress.com or the supplier and the remaining amount is his profit.
Let’s take down the advantages of this instance:
- The Dropshipper never has to own any stock.
- They get the money upfront.
- No Technical Skills are Required.
- No Prior Knowledge of Ecommerce is required.
- Very Easily Scalable (1K or 100K).
- Highly Profitable and you can run it from anywhere.
How to Start Dropshipping Business?
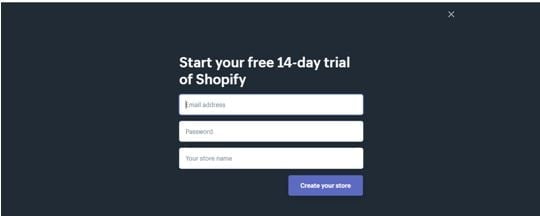
The Second Step is to set up a free 14 day Shopify account.
Enter the Email-address and password and you need to select a store name. You don’t need to worry about selecting a store name as it can be changed later.
After entering the details, another window will appear which will ask you to tell something about yourself.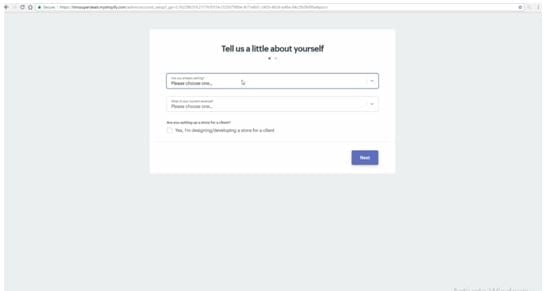
In this window, It will ask you about a few details like:
- Are you Selling?
- What is your Current Revenue?
- Are you setting up a Store for a client?
In the 1st option, you will select the option “ I’m not selling products yet”.
In the 2nd option, you will select the option “ $0 (I’m just getting started).
The third option will leave unchecked as it is not required.
After filling up the details and clicking on the next option in the below right corner, another form will appear in which the personal details will be filled.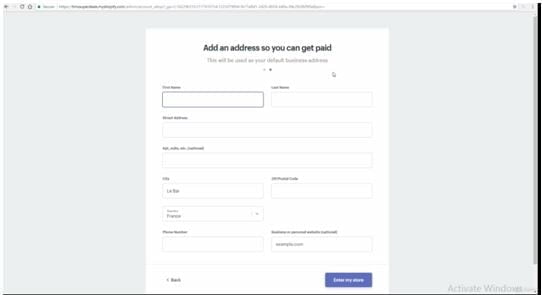
Now, fill up your details like First Name, Last Name, Address, Phone Number, ZIP/Postal Code, Country and click on “Enter my store” in the below right corner of the page.
After Clicking on the “Enter my store” option, The Dashboard of your store will appear. Do not select any plan as we already have a free 14-day trial plan.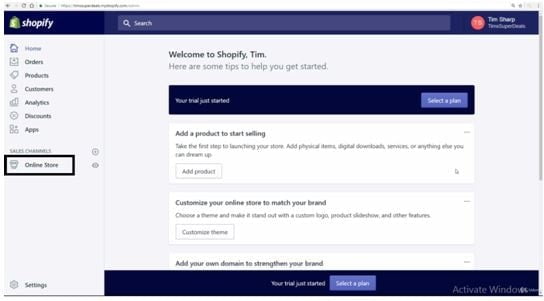
Now, you can see there is an option of an Online Store in the left side menu bar. Click on that option and it will open up your store. It has set up your store without doing anything. Here is a look at it.
Now your Shopify Store has been set up. Now we will Customize it according to our niche with various themes and plugins. The Best Thing about Shopify is that it offers all the apps or plugins for free. So you can personalize your store according to your wish.
We can increase the functionality of our store by downloading the apps, some of them are free and some of them are paid.
It is very important to personalize the setup of your store and manage the look and feel of our store. There are various options to personalize your store such as Themes, Blog Posts, Pages, Navigation, Domains, Preferences.
At the bottom of the page, on the left-hand side, there is an option of Settings. When we click on that, a window appears.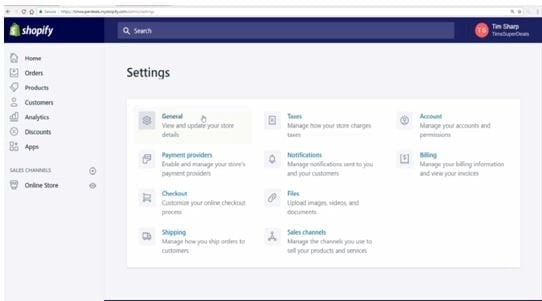
When you click on the General Option, you can modify your store details such as Store Name, Account Email and then you can change your store address as well.
Now you want to add pages to your store like About us, Contact us. For that, you need to click on the online store option and then click on Pages option to add/modify your pages.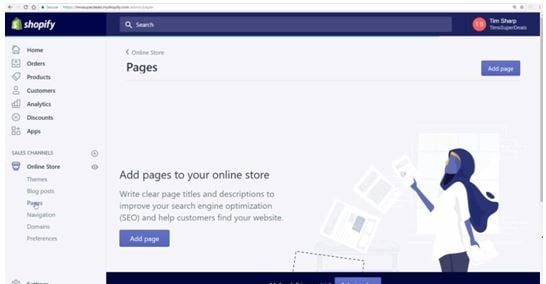
You can see the option of “Add page”. When you click on that option, you can create multiple pages for your Shopify account.
Now, when you click on the “Add page” option, the above window will appear in which you have two columns, one with “Title” and the other with “Content”.
In the Title Column, you will put the title of your page which you wish to put. For Instance, About us, Contact us page, etc. are the title of the pages that you can create in your Shopify store.
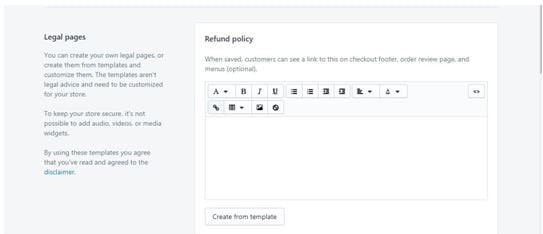
Adding a Refund Policy, Shipping Policy, Terms & Conditions, and a Privacy Policy
The third step is to add the very important pages to our store and Shopify makes it very easier to add these pages to our store. These pages are Adding a Refund Policy, Terms and Conditions, Shipping Policy and a Privacy Policy. It is very important to add these pages to your store to authenticate your store and follow the guidelines as per Shopify.
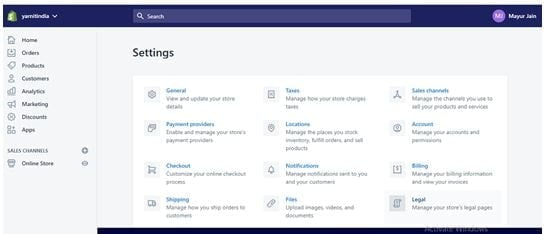
When you click on settings, there will be one option of “Legal”.When you click on that option a window will appear.

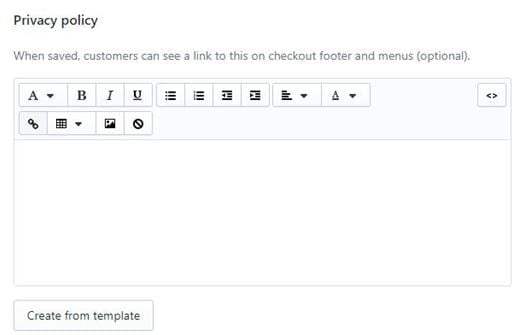
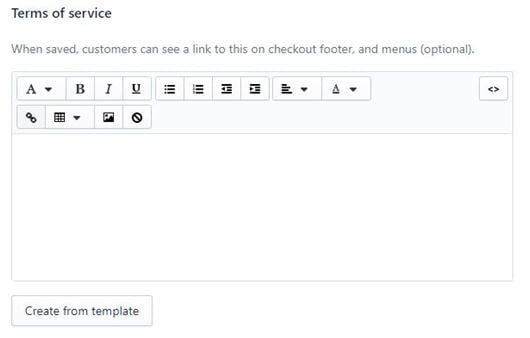
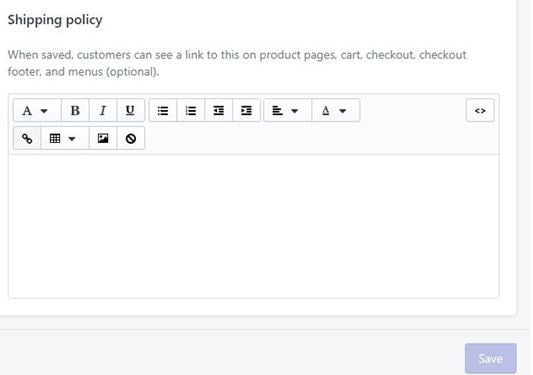
The best part about creating these forms is that they come with the free template option. So you do not need to create or write content for it. Just click on the option “Create from Template” and your Legal Documents will be automatically created.
Improving Navigation
Now after adding the relevant pages to your website, your website will appear like this:
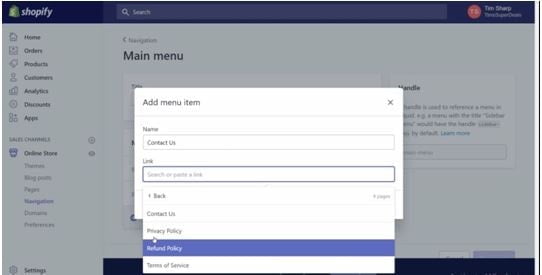
Now to add something extra into the Main Menu, Just click on Main Menu and simply click on “Add Menu Item”.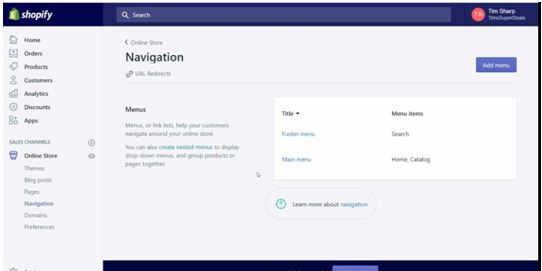
When you click on “Add menu item”, a window will appear showing two options of Name and Link. Just add the Name of the page and corresponding link attached to it and then click on Save.
We will replicate the same process for the Footer Menu. We will go to Navigation again and click on the “Footer Menu” option.
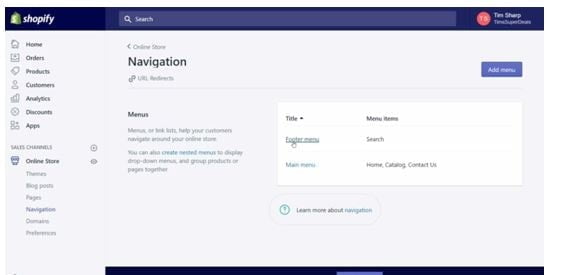
When you will click on the “Footer Menu”, a window will appear.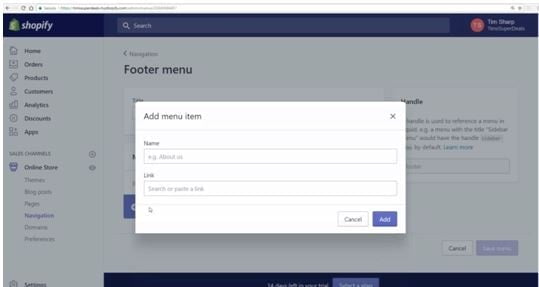
In the Name Column, you will add the Terms and Policy agreements that you have created earlier in this overall process.
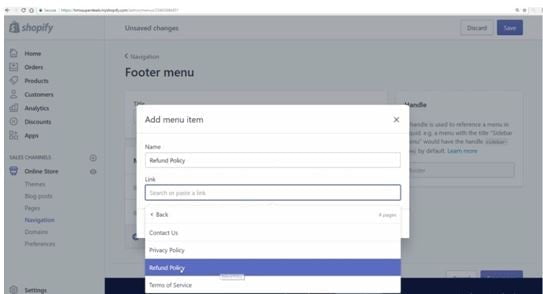
And subsequently, you will add “Terms of Service” and “Privacy Policy”.
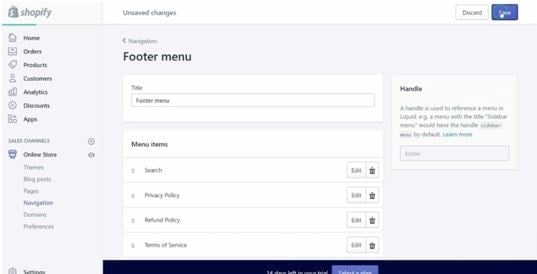
Adding all the Menu Options, you will click on “Save” and your Home page and other pages will appear like this:
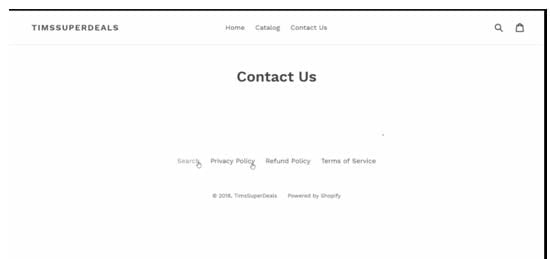
Now when you click on Privacy Policy, Refund Policy and Terms of Service option, your pages with content will appear.
Now the Next part of Building our Shopify Store is to Create a Logo.
Logo Design shows Professionalism and is a very nice way to start building your brand.
To design and create a beautiful and attractive Logo, we can outsource this task to websites like fiverr.com but the one you can use is Canva.com in which you can create all kinds of amazing readymade logos for free.
Creating a beautiful logo, it is time to set up some great images for your store to drive huge traffic to your store. Some Websites offer these services for free and some for pay.
Paid Websites Free Websites
www.istockphoto.com www.google.com
But in google.com, there is a problem with copyrighting of images. Therefore I will suggest you use the “Labelled for reuse” option in the Usage Rights column of the Google page. Also, Google offers images with defined ratio and limits to specific images only.
Check out this comprehensive list of free image sites!
Shopify Theme For Dropshipping Business
The Themes are the shop window to the store. By Default, Shopify provides you with a “Debut” theme. It demonstrates how themes work.
You can Customize this theme and make it according to your wish.
Homepage
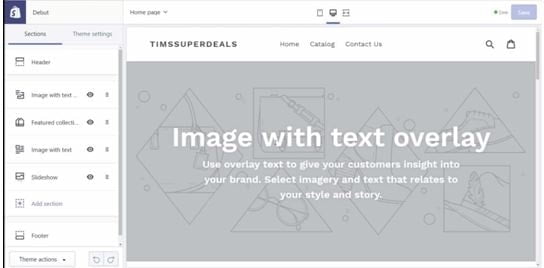
When you click on Customize, a window will appear as shown below:
Now can play around with various options to test what works for you. My advice is to go through each option of this page so that you get hands-on practice on every option.
Under Sections, the first option is of “Header” and there we can upload a Logo Image.
Now you will select an image from your gallery and upload it and can make customize according to your own choice with various options present there.
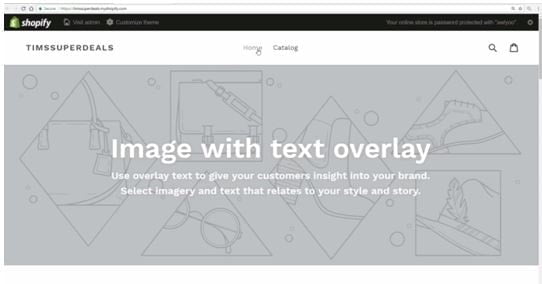
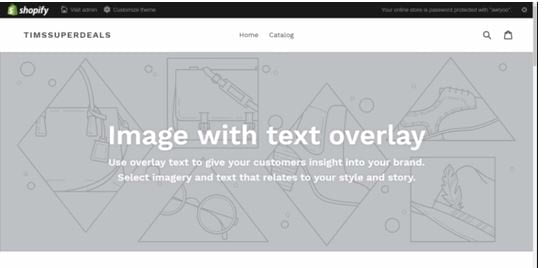
Then, We will move down to 2nd option which is “Image with text overlay”.
As you scroll down the options, you can see various options to edit the image and make it more attractive. Here you can change the Heading and Text according to the content you want to write.
Now, as you scroll down, there is an option of “Button Label” and “Button Link”.
“Button Label” is used to further extract the topic which you want the visitor to see. For Instance, you can write there “Discover More” to redirect the visitor to another page of your store which you want them to visit.
“Button Link” is the link used to redirect visitors to that particular page that you want them to visit.
And do not forget to save the changes that you have done on your page by clicking the “Save” button on the top right corner of your page.
Now, How to Change the Background Image which is appearing on our Homepage.
It is pretty simple.
Go to “Come and Visit our Store” option in the backend of your website and select an Image from your computer by clicking on the “Select Image” option in the Image section.
Then Upload the Image that you have saved(if) or otherwise you can search it on google and other mentioned Platforms.
You can further make changes in the image by various options that are present on the left sidebar of your window.
So within a few minutes, you will see that you have come from a completely blank homepage to something that looks cool and I have used no technical skills at all. It’s just pointed and clicks.
Now to check where your images are stored, you just need to click on “Settings” and then click on “Files”.
Here are all the images that you have uploaded are stored. So you can Delete, Modify and upload your Images from this section.
This is just an example of one theme. But you can play around hundreds and thousands of themes in your Shopify store.
Choosing and Adding Other Themes
When you scroll down the themes store, you will find various options such as “Free Themes”, “Shopify Theme Store”.
When you will click on “Free Themes”, a window will appear.
You can select various Themes according to your niche from this option. Remember, Each theme has a unique style.
Shopify offers a wide and extensive range of themes on its https://www.themes.shopify.com/ and you can Browse the Themes according to Industry.
So you can see that its all point and click and you don’t need any technical knowledge to create your online Shopify store.
Now, The Next Big Step is Choosing your Market and Deciding what to sell.
CHOOSING YOUR MARKET For Dropshipping Business
This is a very important step in making the business profitable in the long run. There are some prerequisites for choosing the market and the product to sell.
-
You don’t need to find the next amazing trend.
A lot of people feel that they are going to find the next best amazing product that everybody wants and they gonna put it on their website and make profits from it.
Sell into the Established Market.
Check the demand for a particular product in the market and sell that product as you can see that product is selling well and therefore you will promote it on your website.
Now to do this, we have got websites like aliexpress.com,amazon.com to choose the product and the market.
Niche or General
There are two types of a store that you can create on your Shopify account. One is a Niche Store and the other is General Store. Now let’s understand them one by one.
Niche Store: A Niche Store is a Store that particularly focuses on one segment of the Product. For example; Selling Dog related products like Dog Food, Dog Vaccinations, Dog Bed, etc.
General Store: A General Store is a store that sells any product from any niche. There is no particular niche defined in this type of store. For example; Selling Products from some niche like gardening products, Dog products, etc.
If this is your first journey to the eCommerce store, then go for General Store rather than Niche Store to test various products on your store and as time goes by you will see the products that sell. Let the process start wide and go towards the niche.
In this way, you will get the experience to test various products and select that particular product which gives you a higher sales volume.
You should always have one concept in your mind while selling the product:
“People pay to get their problems solved or passion being fulfilled”.
How To Leverage Social Media For Dropshipping Business
Using Facebook to find the products which are Hot Selling is the best technique of all times.
Now what you can do is just put in the Seek Keyword in the Facebook search Column and add “Just pay shipping” as a suffix.
This will help search Facebook for what are the words from other Ecommerce Stores selling their products on Facebook.
Let your imagination run wild and see what you can find in it.
You can see the Likes and Comments on a particular post and can make your decision efficiently and effectively as to what products to choose from and promote simultaneously.
How to Decide what to sell For Dropshipping Business?
Deciding what product to sell in the market is a crucial decision before actually selling them in the market.
Here are the key points or the Golden Rules which you should keep in mind before deciding what product to sell in the market:
- Price: Key Point
Buy at $5 or less (from Aliexpress)
Sell at $ 15-20 (on your Website)
- Making sure that your product is not too heavy as it will incur extra shipping cost which will affect your profit margins or passing that cost to the customers who may not be willing to pay that.
- Do not Sell Fragile Products as they have a high possibility of breakage in transit and if your customer gets it, you will get more refunds, more returns and customers will put a negative feedback.
- Pick High-quality Images of the product from Aliexpress. An Image will sell the product. “First Impression is the Last Impression”. Just keep this phrase in mind while uploading and selecting an image.
An Image increases Engagement.
- Avoid all Branded Products.
There is so much to sell on Aliexpress so do not focus on branded products.
- Can’t be found on Walmart
Walmart is the biggest store in the U.S. Look for a product that people haven’t seen before, a unique product that will engage them in your store. Just Don’t try to sell something that you can buy around the corner.
- Solves a Problem or Caters to a Passion
Products should have the aim to solve a problem or caters to a particular problem.
- Details of Supplier
The supplier needs to be good. The questions that arise while choosing the Supplier is Whether they have good feedback from their previous customers, Whether they have got plenty of stock, Do they provide ePacket (It is a shipping Solution which can expedite the process. It enables the supplier to ship the product within 5,10 or 15 days.
How to add products into Dropshipping Store
There are two types of Products which are sold in the market.
- Simple Product
- Variable Product
A Simple Product has one size and one colour with no variations.
A Variable Product can have Several Sizes, Several Colors, etc. For example, A t-shirt comes up with different sizes and different colours.
First, Let’s see how to add a Simple Product!
Now the First thing you do when you identify a product is:
- Price: We need a price under $4. So here the Price is $1.19. We are well below that.
Can we sell it at $15-$20? Yes, we can.
- Is it Heavy?
No, it is not heavy.
- Is it Fragile?
No, it will not break in transit.
- Does it have High-Quality Images?
Yes, It has High-quality Images.
When you Zoom in, you can see every part of the product. These are the key points to look at as customers make up his mind by seeing the image.
- Is it Branded?
No, there is no label or Brand Name written of any company. Therefore, it can be sold.
- Does it solve a problem?
No, but it does cater to a passion.
The other things you should check are Feedback of supplier, Stock Count, E-Packet, Detailed Seller Rating(The Diamonds that are shown above the image).
Now to add this product in your Store, all you need to do is save the images that are displayed on the Ali express page by just Right-clicking the image and click on the “Save as” option.
Then go to your Shopify Store, Click on “Products” and click on “Add Product”. A Window will appear.
This is the page layout where you will add your product details like Title of the Product, Description of the Product(always lead with the question), Images of the Product(High Quality), Pricing(by offering discounts on your product), Inventory(Leave it Blank), Quantity.
Title: Title is the key aspect of driving consumers towards the funnel after the display image of the product. Do not copy the same title of the product as given in the Aliexpress.com. The title should be Simple.
Description: Description is the aspect that drives the consumer further in the Funnel. Keep it engaging by leading it with a question.
Adding some bullet points in the Description to make it clear for visitors. Do not make it too lengthy.
Images: As I said earlier, Images are the key drivers of consumers purchasing your Shopify store. Images should be of High Quality and should display every part of the image.
Pricing: There are two options in Pricing.
- Price
- Compare at Price
The basic difference between the two is Price is the Final Rate of the product and Compare at Price is the earlier rate of the product.
Generally, to attract the consumer’s many drop shippers use these options so that consumer thinks about it is a discounted price.
Keep that Charge taxes on this product box ticked.
Inventory: As it is a Zero Inventory keeping Model, therefore we will leave at column empty.
Keep the “Shipping” option checked on.
When you scroll at the bottom you will see the “Search Engine Listing Preview” option that will show how your Product Website will be listed and shown on Search Engine.
After filling up all the details, click on the “Save” option on the top right corner of the page.
You can view the product that you have just added by clicking on the “View” option on that window only.
After Clicking on the “View” option, a new window will appear.
Now there is an Exercise for all of you. Go to Aliexpress.com, find some products and just go through there description and images and get familiar with the process.
How to Add a Variable Product!
Variable Product is a product that has several sizes, colours, and variations. For Example, A T-Shirt that comes up with Different Sizes, Colors, and Variations.
Now, How to add a variable product on your Shopify Store!
Now you can see that the Dogs are in three different colours, it is, therefore, a variable product.
Now as you scroll down, you will get the images of the product that you will import on your Shopify store.
We will repeat the same process as we have done to add a simple product with some modifications.
The only modification we will do between Adding a Simple Product and a Variable Product is that we will add Variable Products that have different Variants.
When you will click on “Add Variant” option, it will have 2 Columns-
- Option Name
- Option ValueIn Option Name, you can write the attributes of the product such as size, the colour of the product.
- In Option Value, you can write the value of the Options that you have given. For example: In the “Size” option name, you can write about different sizes of the product i.e., 5,6 or particular specifications and in colour, you can write about the various colours available for that particular product.
After Entering the variations in the “Variants” Column, you will click on the “Save” option, you will see the variations in the Variant Column.
Now we will associate the right image with colour and put the Price of that product accordingly.
When you will fill up the Above Details, and click on “Save” option and then click on “View”, a new window will appear:
Now there is a drop-down option in the “Color” Section where you can select different options of colours and subsequently, the price will also change.
You can go to Aliexpress and add a variable product to your Shopify store and start familiarizing yourself with the prices and variations.
COLLECTIONS
When you have got products on your site, the next thing you will do is to group them up logically.
There is a default Collection called “Homepage” in the Collections Section.
To Create a New Collection, you will click on the “Create Collection” option and a new window will appear.
You will enter Title, Description, Conditions(choose Manually select products) option and click on “Save Collection”. In this way, you can create multiple collections for your Shopify store.
How to feature these products on your Homepage
When you will go to the “Products” Section and click on all products, on the right side of the window there is an option of “Collections”. In that option Select “Homepage” from the drop-down list and when you will save that and refresh your website, you will see that the products will appear on your homepage.
You can replicate the same process for all your collections to improve the customer experience.
How to set up your Homepage
In the Dashboard, go to “Themes” and then click on the “Customize” option in the Current Theme Section. You can easily grab the sections and move them according to your own.
You can hide the different sections of your page by clicking on the “eye” button which is present in every section.
You can play around with different options present in sections.
After making all the changes, you will click on the “Save” option and can check out your homepage.
How to import products automatically
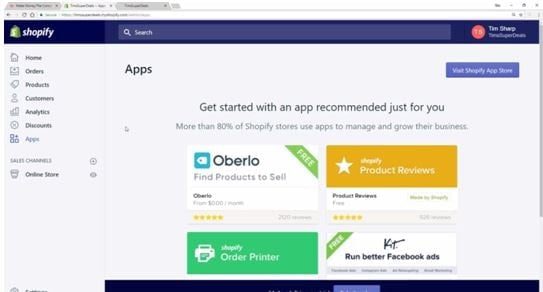
There is a process to add products automatically to your Shopify store. By using an app called “OBERLO” what you can do is, you can directly import products from Aliexpress and it can do order fulfilment.
Now to install this App, you will go to the “Apps” option in the main dashboard of Shopify and click on Visit “Shopify App Store”.
Then Download the Oberlo App from there. Once you have installed that app, then there are some formalities to be done in the form of Steps. First two steps have been completed automatically by the Oberlo and third and fourth step is to be done manually
The Third Step is to Find and Add your first product. When you click on “Find Products”, it will take you to Oberlo Search Engine.
In the Menu option on the left sidebar, There are various options such as Dashboard, Search Products and to find an exact product just type in the Exact Keyword in the Search Bar above and you will find the results coming from Aliexpress.com.
To import any product, what I will do is move your cursor towards that particular product and you will see an option of “Add to Import List” and when you click on that option, It will automatically take that product from Oberlo and put that into the “Import List”.
Now you can see that it has taken the title as well as description and variants with images.
You can also choose to drop down in “Collections”.
The golden rules to use Oberlo:
- Change the Name of the Product imported from Aliexpress.
- Update the Description section with question and Bullet Points.
- In Variants Section, remove the unnecessary imported products.
- You can edit the images according to your own choice.
Note: Do not just blindly click on “Push to Shop” button.
Facebook Ninja Technique:
- In the search bar of Facebook, just type in your Keyword followed by “just pay to ship” and you will see the products that involve the Shipping Cost only.
- There are three key elements to check the popularity of the product on Facebook.
- Number of Likes
- Number of Comments
- Number of Shares
These three elements will define the popularity of a particular product and you can choose accordingly.
How to Setup Facebook For Dropshipping Business
Setting up Facebook Page is the key aspect of Advertising your product on your website. It also helps to check the insights of the audience which is very important in tracking the graph of your advertising.
To create a Facebook Page, all you need to do is click on the “Create Page” option and Another window will open and there you will see various options and you will click on the “Local Business or Place” option.
After Clicking on the “Local Business or Place” option, a small window will open.
After filling in the details, click on “Get Started”. A wizard will open.
Skip through every step as there is no need to fill up these details. After you skip all the steps and click on the “Save Info” option and your Facebook page will be created.
Add a Cover Picture and a Profile Picture. That’s all. No need to further change or edit anything.
Audience Insights Tool
This tool will segregate your audience based on Location, Age, Gender, Interest. You can find this page by typing “Audience Insights Tool” on the search bar.
As you can see, there are various options here and you can filter the demographics according to your niche and choice of market. As you scroll down you will find more options such as Lifestyle, Relationship Status, Education Level, Job Title. These options are customizable according to your niche and interest.
DEMOGRAPHICS OF CUSTOMER
- Age
- Gender
- Where do they live?
- *What products do they like?*
- *What services do they like?*
- *What brands do they like?*
- What communities do they belong to?
The important part of Audience Insights is Page Likes. It tells you about the most popular pages according to the niche which you have entered. So we can target those people who have liked those pages on Facebook.
Changing the demographics will automatically change the Page Likes as well.
There are other options as well like Location, Activity, Household, and purchase but the main focus should be on Demographics and Page Likes.
This page helps you to give an idea of what people are interested in and how to target them.
Building a Dropshipping Store- Live Process
Now it’s time to build a real store. We will look into the different Shopify plans and choose accordingly.
In the Shopify Dashboard, when you will click on “Select a plan” option, then a window will open displaying different plans.
Now, you have to choose a plan to get things started efficiently and effectively. You will see three types of plans that will be displayed on your screen. You do not need to purchase a $299 plan as there is no need for it right now.
Now the question arises that which plan to choose from. Either $29 or$79. The basic difference between the two is the Transaction Fees. The $29 plan will have a 2.0% transaction fee and the $79 plan will have a 1.0% transaction fee. Also in the $79 plan, various options are not present in the $29 plan.
I will recommend you to go for a $79 plan as it has various features that will help you to run your Shopify store efficiently and effectively.
After you will click on the $ 79 plan, a window will appear.
After you fill-up, the details, the last option of the Billing Cycle will appear on your window with various options.
Choose “Bill me once a month for $79.00” option as you are just starting your journey. It is flexible. You can start and stop your plan whenever you want.
At last Click on “Confirm Changes”.
REGISTERING YOUR DOMAIN
Now your domain will look like xyz.myshopify.com. It is called a subdomain. If you have to build your professional brand, then you need to get your domain registered.
There are two options to buy the domain name for your Shopify store:
1. Buy the domain through Shopify.com
- Connect to Existing Domain
- Buy the domain through Shopify.com
In the Dashboard of Shopify.com, you will go to “Online Store” and then you will click on “Domains” and then click on “Buy a new domain”
Now type in the domain name you want for your store. If it is available, it will show up and then you go on purchasing it.
Disadvantage:
- Shopify Do not have a full-blown Email Hosting Service. They just forward emails to your email id or the id which you have entered at the time of sign up process.
- Connect your Existing Domain
You will see an option of “Connect existing domain” in the window. By clicking on that option you can connect your existing domain or the alternative option is buying domain outside the Shopify store form various hosting servers.
ADDING EMAIL TO CONTACT PAGE
Adding Emails to the “Contact us” page and “About Us” page is necessary to keep your customers engaging.
You should have two email addresses for your Shopify store:
ADDING TITLE AND META DESCRIPTION
Now to add homepage title and meta description, go to the “Online Store” and click on “Preferences” and a window will appear. Now fill up the “Homepage title” and “ Homepage meta description” and click on “Save”.
Keep your Homepage Title as specific and to the point as it can
Make the Meta description using proper keywords with “call to action” to increase Customer Engagement.
ADDING SHIPPING COST TO YOUR PRODUCT
Adding Shipping Cost to your product is an important step in setting up your Shopify store.
3 Shipping Models are used in Adding Shipping Cost to the product.
- No Shipping Costs
The products which only have their price exclusive of Shipping costs fall under the “No Shipping Costs” category.
- Realistic Shipping Costs
Shipping Costs are the major reason for people to just abandon carts at the checkout.
- Free-Just add shipping
This model is vague as it fools the customer by firstly making them purchase a free product and then add the shipping cost along with it which is too costly. Therefore, I recommend do not use this model. It does not build long term trust with the customer.
HOW TO IMPLEMENT BASIC SHIPPING PLAN
Go to the “Settings” option and click on “Shipping”.
There are different charges for different kinds of Shipping. One is Standard Shipping and the other is Heavy Goods Shipping.
Both have their set values according to the weight of the product through which the shipping cost will be calculated and charged from the customers.
When you will scroll down, you will see an option of “Shipping rates at checkout”.
“Shipping Zones” are of two types:
- Domestic
- Rest of World
- Domestic: It is that place where your products will get shipped to different parts of the world.
2.Rest of World: It is placed apart from the domestic territory.
You have to set standards for calculating the shipping costs of your product as I have shown in the above image.
When you click on “Edit”, a window will appear.
Ignore the weight-based rates as we are drop shippers and we don’t bother about the weight of a particular product.
Click on “Add rate” under “Price based rates” and a window will appear.
Give it a name, create a range between the prices as per the rules. Take it $20 as a maximum price and give the “rate amount” of $2.95 and click on “Done”.
So if Somebody buys between 0-20$, they will pay 2.95$ as the shipping cost. You can set other values also by clicking on “Add rate”.
PAYMENT PROVIDERS
Payment Providers may differ according to the area where you live. The three main payment providers are Shopify Payments, Paypal and Stripe. As I am talking about India, the main payment providers are Paypal, Third-Party Providers, Alternative Payment Methods and Manual Payment Methods.
To seek payment providers in your country, click on the link below.
MAKE A TEST ORDER
To make sure that the store is functioning correctly, a test order is made. Before starting selling anything on Shopify Store, it is necessary to Test the order once a month on your Shopify store to increase the efficiency and effectiveness in the process. You can refund that product that you have purchased on your site after purchasing it.
Now, just make a purchase of your product on your site.
When I click on the “Heart-Shaped dog pendant”, another window will open.
Click on the “ADD TO CART” option and you will be redirected to “Your Cart”.
Now, you will click on “CHECKOUT” Option, another window will open.
For Testing Purposes, I have put fake details. Here you will get the price of Shipping and Subtotal. We have Payment Method set up as “Paypal” and click on “Complete order”.
The Paypal Window will appear.
Login in with your Paypal Login id and Password and your payment will be done.
Now to the “Orders” page in your Shopify store and you will see that the order has been placed successfully.
When you click on your order, a window will open.
Now, everything looks in good shape and now I will click on “Refund” as it was just an order test.
After your refund is done, you will see the above option ticked.
AUTOMATED EMAIL NOTIFICATIONS
The Automated Emails are set up by Shopify to ease the customer satisfaction process.
To Set up this, You just need to go to “Settings” and click on “Notifications”. A window will appear.
Here is the Complete Email set up for everything and you do not need to change anything in it. It’s all Automated.
When you will click on any option, you will see the automated emails already being set up for you.
FRAUD ANALYSIS TOOLS
When you will click on “Orders”, as you scroll down you will see an option of “Fraud Analysis” on the right side of the page. This tool has used some algorithm to check whether the order is Fraudulent or not.
When you will click on “View Full Analysis”, another window will open.
These are the parameters which check the fraudulent activities of the user.
How to Get Sales For Dropshipping Business through Facebook Ad
This is the Monetisation step for your Shopify Store. After Building up the Store, now it’s time to drive the traffic to your store through various mediums or platforms.
Setting up Facebook Advert Account
Setting up Facebook Advert Account is Free and Straight Forward.
If you go to your Facebook page that has been set up earlier in this process, click on the arrow on the top right of the menu bar of Facebook and click on “Create Ads”.
Now, if you do not find this option on your Facebook account, just go to Google.com and type “set up Facebook advert account” and you will see the complete procedure of setting up the Advert account.
The above steps will help you set up the Facebook Advert account efficiently and effectively.
HOW TO ADD FACEBOOK PIXEL TO YOUR SHOPIFY
It is the tool or code used to track the visitors that come to your site. To Install Facebook Pixel, you need to go to Facebook Advert account and click on the top left three lines where various options are displayed. Select “Pixels” from the options and if you do not see that just Google “Set up Facebook Pixel “and you will get it installed easily.
When you click on “Pixels”, you will be redirected to a page.
Click on “Create a Pixel” and a small window will open.
Now Click on “Create”.
Now will be Install “Pixel Code”.
Click on the first option “Use an Integration or Tag Manager”.
When you click on that option, a window will appear.
You will see the icon of “Shopify”. Click on that icon and another window will open.
Just Copy this Code and go the admin system of Shopify, click on Online Store and click on “Preferences”. And when you scroll down, you will see an option of “Facebook Pixel”.
Just paste that code here and click on “Save”.
Now go back to instructions and as you scroll down, you will see an option of “Check the Pixel Status”. Click on that option and a window will appear.
Repeat the same process for google analytics as well. Go to analytics.google.com and copy the tracking id from there and paste it in the “Google Analytics Account” section.
Check the Status. If it is “Active”, then all is going well.
Now go to “Pixels” and a window will appear.
Now check the “Dot”. It should be green. And if it is not green, then just go to your store and click on the various options and then revisit your admin page of Facebook and refresh that page. The green dot will appear now.
Now your Pixel is Installed successfully.
SETTING UP YOUR FIRST FACEBOOK AD
Setting up a Facebook Advert account is a vital step in driving traffic to your Shopify store. For setting it up, you need to go to “Facebook Ads Manager” and a page will appear.
Here you will find three categories under What’s your marketing objective:
1.Awareness
2. Consideration
3. Conversion
Awareness is all about building your brand.
Consideration is driving Traffic towards your brand.
Conversion is any event on the website. Example: Visiting a page, Putting something into the cart, Buying something from the store
We will focus on “Conversion Ads” as our ultimate goal of Creating an Ad is Converting the Visitor into the Potential Customer.
When you click on “Conversions” under the heading “Conversion”, an extraction will open under the same window. When you will Scroll down, you will see this:
Now we will create a “Campaign Name”. The campaign name should exactly say about what you are advertising. Then Click on “Set Up Ad Account”.
A window will appear Showing your Account Country Currency and Time Zone. Set it according to your time zone and click on “Continue”.
This Form is all about Defining the Audience that you want to target your site to buy your product.
The First option is “Ad Set Name”. You can name it as “Ad set 1” as you will be going to create multiple ads.
You will enter the details according to your interest in targeting the audience and you will find that on the right side of the window, there is a small Digital Meter that shows the Potential Reach of the ad which you are creating.
You have to define your audience to increase the reach of your ad on Facebook.
There is a Section of “Detailed targeting” which is related to buyers and communities in which you can narrow down your target audience.
Your Potential reach should narrow down according to your niche, behaviour, and interest of the people.
It is done to find the people who will go to buy the product.
Just type in the product name and click on the “Narrow Audience” option.
Note: When you are testing your product, your potential reach(Target Audience) must be 500,000 to 1 million.
Defining your Target Audience is your key to success for Facebook Ads or Google Ads.
Now, the next thing we will be going to look at is the “Placements”.
It shows your ads to the right people in the right places.
By default, it is set to “Automatic Placements”.
But you have to change it to “Edit Placements”.
A drop-down list will appear.
At the top, there is an option of “All Devices (Recommended)”. When you click on that option, two choices will appear. Click on the “Mobile Only” option as the majority of people are using the internet on their mobile rather than on desktop.
From the Platforms, Just tick on “Facebook” and “Instagram”. Untick all the other options as they will bring you poor-quality traffic.
When you further scroll it down, you will see an option of “Budget & Schedule”.
Now, the Budget should be between $3 and $5 a day, as we are just testing the product. Once you will find a winning product, you can scale up your budget.
Keep the rest of the options unchanged and then click on “Continue”.
Now your “Ad Set” account is fully set up.
The next step is to set up create a “Facebook Ad”.
FACEBOOK AD
When you click on the “Add” option, a window will appear. This window will help you to set up your “Ads”.
The First Column is of Ad Name. Here you will enter your Ad name say “Advert 1”.
The identity is the Facebook Page that you have created.
In “Format”, there are various options available but you will click on “Single Image”.
As we scroll further, there is an option of adding an “Image”.
Click on “Upload Images” and choose the selected images from the gallery.
Once the image is uploaded, you can crop it according to your own choice by clicking on the crop icon placed on the bottom right corner of the image.
On the right-hand side, you can see that there are two options, One is of Facebook and the other is of Instagram. When you click on Both the options simultaneously, you will see how the image will appear on both the platforms.
Click on “Done” when everything looks fine for you.
As you will move to the Last section of the page, there is an option of “Links”.
The “Links” section is all about where the customer will go when they will click on your ad. As you can see the Ad on the right side and left-hand side, there is an option of “Website URL”. Link the Product Page of your website here as you want the customer to go to your Products Page rather than Homepage or any Other Page. Just go to your website product’s page link and copy that link and paste it to the “Website URL”. It will automatically fill up all the other details.
Just change the “Text” so that it looks more appealing and drives the customer further towards the funnel. In “Call To Action”, select “Shop Now” option.
After making these changes, just click on the “Confirm” button on the right side bottom.
Now you will have your very first Ad setup
Note: When you click on the “Confirm” button, you may see a prompt to enter your “payment details”. Once you will enter it, the above page will be shown on your screen.
HOW TO JUDGE THE PERFORMANCE OF THE AD
⦁ Run your Ad(s) for 3 days.
⦁ Run your Ad(s) for 3 days.
The Facebook algorithm takes 24-48 hours to start serving your ads to the Target Audience.
⦁ The key objective is to make a profit or at least a breakdown.
⦁ Not at of your ads will generate sales. May 1 out of 10 ads will make a sale.
⦁ If the ad is not performing for consecutive 3 days, we will kill it or stop that ad.
⦁ A Winning Ad can generate huge profits.
HOW TO SCALE YOUR AD CORRECTLY
⦁ Increase your budget by 1.5x.
If you are spending $3 a day and found a winning ad, increase it to $4.5 a day and keep it for another 3 days.
⦁ If you generated profit within this time frame, then increase your budget by another 1.5x.
This is how it goes. Profit is the main aspect of scaling your business correctly.
Tool: www.luckyorange.com
When you are starting your business and want to make sure that everything is running efficiently and effectively, this tool will help you track traffic on your site, Behavior of the visitor when he/she is on your website. The problem areas like why bounce rate is high on your site, Why is your Cart getting unchecked at the checkout.
RE-TARGETING
When a visitor comes to your site, We will track those actions so that we can target them later. These actions could be Clicks, products they look out, What kinds of stuff they put on their cart so that we can target them later.
What can they do on your site:
- Buy a Product
- Put Products in the cart but do not buy (Abandoned cart)
- Just surf or browse products.
So the question arises, how can we retarget them?
- Send them an Email (If we have it when they have abandoned the cart)
- Show them Ads on Facebook
- Show them Ads on other sites
ADVANTAGES OF RETARGETING
- Bring in New Customers
- Sell more products to existing customers.
- Very Effective
TIPS:
- Use free retargeting techniques in the beginning.
- Switch to Advanced strategies only when you have got hands-on practice on Facebook advertising and you are making money out of it.
FREE RETARGETING TECHNIQUES
These techniques are included in the Shopify Plan.
- Recovering an Abandoned Cart:
- 67% of the carts get abandoned.
- Abandoned Cart Recovery Software can convert up to 50% of the abandoned cart into sales.
Go to Shopify Admin, click on Orders and Click on “Abandoned Checkouts”.
Click on the number under the “Checkout” section and you can retarget them using their email id.
- Direct email
Email Marketing is an efficient and effective way of Direct Marketing.
There are some rules for sending emails:
- Do not spam
- Imagine that you are having a real-life conversation
- Use it for existing customers to promote new products
- Start with Manual form of sending Email and send no more than 1 mail every 10 days.
- Retargeting with Facebook
It is a paid technique. We will look into how we will get the people with a Facebook Account back who have visited our website.
The First thing you will do is to “Find your Audiences”.
For that, you will go to the “Ads Manager” Account and find the “Audiences” option under heading “Assets” in the menu.
When you click on “Audiences”, another window will open.
Click on “Create a Custom Audience” option and a small window will open.
Click on “Website Traffic”, another window will open.
In this window, you can see that there is an option of “All website visitors”. You can modify it according to your own choice. Give it an “Audience Name” and click on “Create Audience”.
Now you will arrive on your “Audience Page”.
Here you will see various options. When your click on “Custom Audiences”, you will see a drop-down list will appear. From here, you can select the Audience that you have created in the previous step.
In this way, your retargeting ad will be created.
ORDER FULFILLMENT
Now the customer has placed the order on your website and it’s your turn to fulfil the order of your customer.
There are two types of Order Fulfilment.
- Manual Fulfilment
- Automatic Fulfilment
To change the Order Fulfilment Settings, all you need to do is go to “Settings” options and click on “Payment Providers”. Scroll down to the bottom to see an option of “Payment Authorization”.
- Manual Fulfilment
Now you have got the order and you will place the same order on Aliexpress.com.
To fulfil the order, you first need to generate an order. As you can see in the image above, the order number #1002 is unfulfilled and its Payment Status is Authorized.
To Fulfil this order, click on “Order Details” by clicking on the Order Number and a window will open.
All you need is the Name and Address of the Customer. Now what we will do is buy this product from “Aliexpress” and have it shipped directly to the customer.
Go to Aliexpress.com(Create an Account) and go to that product page that your customer has ordered.
Now just to check out, It will be noted that that the supplier has plenty of stock available to ship the product and making sure that “ePacket” is available as the “Shipping Option”. After all, boxes are ticked, you will click on “Buy Now” and a window will appear where you will fill in the Shipping details of the Customer. Now make sure that you enter the Customer Details who have purchased this product from your Shopify store here.
Now you will go to the “Orders” page on your Shopify Store and will take the Name and Address of the customer and put in that details in the “Aliexpress Shipping Information” page.
Note: In the “Mobile” column, put in your Mobile Number as you are the Middleman between the Supplier and the Customer.
After entering all the details click on “Save and ship to this address”.
Another window will open which will help you to review your order and confirm your order. Just make sure that the details filled by you are correct and accurate.
Note: When you will review and confirm your order, there will be a small window that will display “Leave a message for this seller”. In this window you will write the following message: “Please do not include the original invoice. This is a drop-ship. Thank You.” This is important as you are building a long term profitable business and customers will get the information from where the product is shipped from and what is its price.
Fill in your Card Details as you are the Dropshipper and now you will be paying to Aliexpress.
Only a Few Formalities left now. Just go to your Shopify store and in the “Orders” page, click on the “Start Fulfiling” option.
A Window will open.
Now you will see that the Order has been fulfiled. When you scroll down, you will see all the details of the “Fulfiled” order in every section.
For overall confirmation, go to the orders page and a window will appear.
When you click on “Capture Payment”, a window will appear.
Click on “Accept” and your payment will be accepted.
Note: In the Billing Address Section, Put in the Address that corresponds with your card details.
The process is done.
AUTOMATIC FULFILLMENT WITH OBERLO
How to automate the complete process? You might be thinking that all the processes discussed above are manual and will take time.
Don’t worry. Shopify offers a Software through which all the processes will get automated. That Software is called “Oberlo”.
Note: Oberlo’s order fulfilment will only work if you used Oberlo to import the product in the first place.
Oberlo only works with chrome. So if you don’t have chrome installed in your system then get it done for the smooth functioning of the overall process.
How to Install Oberlo:
Step 1: Go to Google.com and type “Chrome Web Store”.
Step 2: Click on the first link that appears on the screen
Step 3: Chrome Web Store will open and type “OberloAliexpress” on the top-left search bar of the Page.
Step 4: An extension will appear as “Oberlo-Aliexpress.com Product Importer”. Download this extension by clicking on the “Add to Chrome” button and it will automatically get installed in the chrome.
Now, We will go back to the order form to see how it works.
We will go back to the “Order Fulfilment” Page.
The only thing you need to make sure is that Payment has been accepted.
Now we will go to “Apps” and click on “Oberlo’.
A window will open.
On the Left Side Bar, there is an option of “Orders”.
When you will click on it, you will see the product in the “Oberlo” App.
Now we will be going to change some settings in this app.
We will click on the “Settings” option which is the last option in the left sidebar of the page.
When you click on that option, a page will open.
We will click on the “Suppliers” option and change some settings there.
As you will see, there is an option of the “Default shipping method”. Set it to “ePacket”. In the “Override phone number” option, enter your Phone Number. In the “Custom Note” option, Type “ Please do not include the original invoice. This is a dropship. Thank you.”
Then Click on “Save Settings”.
Now we will click on “Orders” to go to the Orders Page.
Click on the “Order Product” option and your process will start automatically.
After the Process gets completed, you will be directed towards the “Review Your Order” Page. Please check all the details on this page and enter your payment details under “Payment Method”.
Please check the message that you have entered.
Click on Confirm and pay.
Once the order is approved by the supplier, you need to sync your account with Oberlo.
To do that, Go to your Aliexpress page and click on the “My Orders” page.
A window will open.
Click on the “Sync this page” option and your Data Sync will be completed.
Now when we head back to Oberlo, we will see things getting changed.
As you can see now, the order is in processing and “Ali Order No.” will be the same as the order number of the product on the Aliexpress page.
After processing this, you will notice that the processing time is reduced to under a minute from 5-10 minutes.
It’s all practical.
Do it yourself. Then only you will get hands-on practice.
DEALING WITH REFUNDS
As we are dealing with low-value items, Therefore it will not hurt you in the long run. Treat this as an opportunity to build a relationship with the customer.
Refunds, Returns, and complaints are all a part of building a long term business. Improve yourself by dealing with these issues.
ADDING CREDIBILITY
Adding Social Proofs, FAQ Pages, Securing your Site and doing a live chat with customers or through there contact numbers will build Long term Credibility of your business towards the customer.
Customer Satisfaction is an important aspect of Pre-Sales as well as Post-Sales.
Social Proof: Building a Facebook Page of your Brand builds a long term trust of the customers on your brand.
You can promote your Facebook Page which you have already created by visiting that page and clicking on the “Promote” option located on the left side of your page
When you will click on the “Promote” option, a small window will open.
Click on “Promote Your Page” Option and another window will open
Just modify the settings according to your budget, Duration, and demographics and click on “Promote”. Start it with a minimum budget and a minimum number of days.
BUILDING FAQ PAGE
Another way to build Credibility and loyalty towards your Customer is Building a FAQ Page on your Shopify Store.
To install this page, Simply go to Shopify App Store and search the FAQ and install it from there.
Secure Your Dropshipping Store
To secure your site, you need to have “https” in your domain. By default, if you have purchased your domain from the Shopify store, it sets it up automatically or has to take an “SSL Certificate” from your hosting provider. Most of the Hosting Providers offers this certificate for free.
Some Apps to Secure Your Site:
1.Rewind-Backups for Shopify
It will help to take a backup of your site. It offers a 14-day free trial and then it is priced at $5/month.
- Tidio Live Chat
Include a Telephone number on your site so that people can call you to get their queries solved. Provide Email id of your business.
You can also apply for a Toll-Free Number for your Shopify Store on www.grasshopper.com for better customer satisfaction.
How to track Sales and Expanses of Your Dropshipping Business
This is an important part of the business. It is essential to keep daily track of your business activities in the long run.
You can maintain it in an Excel Sheet efficiently and effectively.
You can enter your daily sales and expenses and create various sections in it to track your daily business activities.
You can use Softwares such as Tally to maintain it as well.
IMPORTANT NOTE: This is not a get rich quick scheme or something. But one thing I can promise you that if you follow the steps and procedures that I have mentioned in this blog, You will surely build a profitable niche Dropshipping business in the long run
Dropshipping Companies in India
If you want to start a dropshipping business in India, then you can go for it without a large investment and a heavy inventory. It is a very convenient online business where you can sell a wide range of products to anybody willing to buy them without any hassle.
Many dropshipping companies in India allow you to start your online business right now. You can sell either your own products or use them as dropshipping platforms. Let’s discuss a few of the most popular and trusted companies in India.
IndiaMART
IndiaMART is a well-known company and India’s largest online B2B business marketplace with over 60% market share. The company has a beneficial platform for Indian suppliers, whether small and medium enterprises or large businesses. It connects buyers to the sellers with the help of their online portal.
Dinesh Agrawal and Brijesh Agrawal established the company in 1999. Dinesh Agarwal is the founder and CEO of the IndiaMART and the headquarter is in Noida. The company has around 41 offices across the country that gives employment to over 2826 people.
So, how can you start dropshipping with IndiaMART? Any business or an individual can register for free on the website of IndiaMART in the following simple steps-
- Enter the 10-digit mobile number and click on “Submit”.
- Verify your mobile number by entering the OTP received on your mobile.
- Fill up the basic details such as Your name, Company/Business name, Email Id, etc.
- Click on “Submit” and verify the entered email address.
- Add any 3 products to your catalogue.
- Mention your address like your City, PIN Code, State and click on “Continue”
- Provide your GST details and now you can start selling.
There is no validity or expiry of IndiaMART seller account. But, only Indians sellers can create an account on this IndiaMART. After successful registration, you can visit seller.indiamart.com to add more products to your catalogue by entering its name, images, specifications, description, etc. After approval from the IndiaMART team, it will reflect in your catalogue.
In this way, you are ready to sell a wide range of products to the audience that is searching for them. The customers of IndiaMART are generally businesses that place their orders in bulk quantity or search for heavy products such as machinery, industrial equipment, etc.
You can create your online store, contact with the Indian suppliers and market a wide range of products to reach the potential buyers. When someone places an order, you can send the details to the suppliers and they can ship the orders. You can easily run a successful dropshipping business on this platform.
TradeIndia
TradeIndia is an online B2B e-commerce platform and a great option to start an online business. It was started by Bikky Khosla in 1996. He is the current CEO of the company. The headquarter of the company is in New Delhi. The company has offices in 35 cities across the country and gives employment to around 12,000 people.
TradeIndia is the largest competitor of IndiaMART among all the online business companies in India. It provides 360° business solutions such as digital marketing, payments, logistics, business loans to SMEs, MSMEs, manufacturers, etc.
The company has more than 2224 different product categories and sub-categories. The platform allows global buyers to find Indian suppliers and manufacturers. TradeIndia claims to be the first Indian online B2B business marketplace to cross 3 million registered users.
You can also register and use the portal as a dropshipping platform to promote and sell the products and services of other businesses online. Following is the procedure to register as a seller on TradeIndia-
- Visit the registration page to fill the form.
- Enter the basic details such as Mobile Number, Email id, Your name, Company name, Pincode, etc.
- Read the Terms & Conditions and select to Agree with them.
- Click on “Register”.
- On the next page, log in with your registered mobile number.
- Add the products you want to sell and “Get Started”.
The registration at the portal of TradeIndia is absolutely free and you can also post the products at no cost. You can build your company profile to get international exposure and attract buyers across the globe.
As a free member, you can add up to 50 different products on your store. The buyers can find you and send an enquiry if they are interested to buy your product. You can respond to them and make a deal within the website, via e-mail, or through a phone call.
Another feature of TradeIndia is that the people can post their buying requirement with the description of the product they want. You can browse the requirements posted in your category and contact the potential buyers with your quotation.
The buyers can check your reviews and confirms the order if you can convince them with your online presence. If you already run a business, you can list a wide range of products that you sell or you can sell the products of any other manufacturer or supplier.
For a successful dropshipping business, you need to understand the concepts of online advertisements, social media marketing, etc. It will help you to reach more number of potential buyers to pitch your products.
JimTrade
JimTrade is India’s leading B2B online business platform. It was started under Jupiter Infomedia Ltd. in 2005. The other two content management systems are IndiaNetZone.com and JimYellowpages.com. Umesh Modi is the founder, chairman, and managing director of the company.
Jimtrade.com is an online business directory especially for MSMEs that allows manufacturers and suppliers to showcase their products. The company has its head office in Mumbai and expanded in Kolkata, New Delhi, Ahmedabad, and Chennai. It supports global trading but focuses on the Indian market.
For international buyers, Jimtrade is one of the best options to source Indian products at affordable prices. The company has integrated sourcing, marketing, and cataloguing tool and allows users to browse the products in more than 20,000 sub-categories of 21 industries.
There are over 1,50,000 registered suppliers in the categories of Agriculture, Automotive, Electronics, Industrial Supplies, Printing & Packaging, etc. The registration on the portal is free of cost. Following is the procedure-
- Visit the website of Jimtrade and find “Join for Free” option.
- Enter your email address and create a password.
- Provide basic details such as Your name, Company name, Address, Contact number, etc.
- Click on Signup after filling all the details.
- Complete the verification process.
- List the products on your profile to display to your potential buyers.
- You can use the same login credentials for the buyer and the seller profile.
The company has the largest directory of Indian suppliers and products with more than 5,00,000 lakh product profiles on its website. People can directly find a product and connect to the sellers that are listed and trading worldwide.
You can also register as a seller and start a successful dropshipping business by getting an exposure to the global buyers and connecting with them online. The company provides a wide range of content for the users through its all three web portals.
The registered users can also subscribe to the company’s email newsletter for products and trade update and get rewards with every enquiry.
FAQs
If you are a businessman, an employee, a freelancer, a student or even a housewife, You can start dropshipping as a part-time or full-time business. There is no foundation.
Many people have opened their Dropshipping stores and use it as a secondary source of income. You don’t need to manage the operations. All you have to do is promote the sales of the products through any digital medium.
It is said that you need no money to start a Dropshipping business or you can start it with zero bucks. But practically, you need some amount to set up your online store and then to promote the products that you are selling online. Now it depends on you how much money you want to spend to advertise your products.
The best way to select the right products for your dropshipping store is to target a particular niche. Then you can search for the popular and most selling products of that niche on amazon, google trends, etc.
Choose the products with high demand and high margin and target the right customers to pitch them your products.
Sir Please can you make a detailed tutorial video or free course on it.